Near Vertical Incidence Skywave- Simplified
Communications fall into one of two categories: Line of Sight(LOS) and Beyond Line of Sight.
LOS
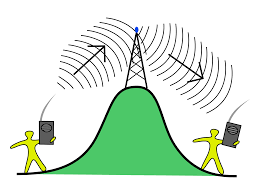
 If you can see it, in theory at least, you should be able to communicate with it. Low-band VHF(30-88mHz, including 6m) and above(VHF, UHF, Microwave) works in this manner. VHF can have some characteristics of HF; but that’s beyond the scope of this article. Squad level communications work in this manner. This would be your mobile rigs and HTs. Keeping it simple, if there’s something big in between you and the person your talking to (like a mountain or a bunch of buildings) or long distance, you need a repeater to compensate. Line of Sight (plus repeater) looks like what’s pictured at right:
Beyond Line of Sight
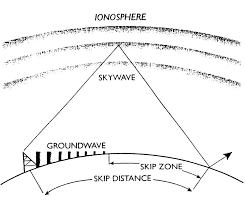
So what if you’re outside the range of repeaters? Eventually the energy from your radio or repeater will fizzle out. At some point it hits what’s known as the radio horizon, where the signal keeps going straight and the Earth curves downward. Say, maybe I want to communicate halfway across the country, regionally. This is where HF comes in. Long distance communications relying upon radio waves bouncing off of the ionosphere. Kinda sorta like what’s pictured here:
 There’s a problem though. Inside the skip zone you may or may not make contact with the intended receiver. From a hobbyist perspective, it may give a thrill to make random contacts, but from a reliability standpoint, it leaves something to be desired. Skip Zones, when bounced off the ionoshpere look like what’s pictured in the diagram.
 Many seasoned Radio Amateurs will tell you that the most difficult challenge to communications is that area inside that skip zone. How do we solve this? Something called Near Vertical Incidence Skywave.
NVIS
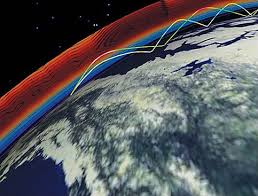
HF radio wave propagation can be shot nearly straight into the Ionosphere, hence the name Near Vertical Incidence. What goes up, must come down. Knowing that all things have equal and opposite reactions, the angle coming down is also nearly vertical. Then it goes back up, and down again, and over and over. Like this:
And it gives you a range Beyond Line of Sight, at the tactical level, like this (minus the TACSAT in the photo):
With a regional picture looking something like this (which goes along with Planning your Footprint) pictured below.
So what does this give us? We now have Beyond Line of Sight Communications that do not rely upon repeaters. Once operators are decently trained and have a good amount of time working in this method under their belt, it can be very reliable.
Important to note is that not all HF bands work well for this. Generally speaking, 160-40M work best due to the way the frequencies themselves refract off the ionosphere. Experience as a Radio Operator should tell you when to use which band based on noise level, the amount of heard traffic, and beacon propagation near your operating frequency will give you a good idea if your traffic will be successfully transmitted or not.
Implementation at the Tactical Level
Just like any tool, it has a use. For units spread far and wide, such as perhaps a statewide area, NVIS is just the ticket to communicate between units. Digital means of message delivery such as RMS Express work well. And with some of the great QRP options at hand these days (such as a Raspberry Pi and an 817) such a system is lightweight and quickly deployable. In addition, it works well in Mountains or other areas where a large number of repeaters would be needed to facilitate communications.
Antenna Options
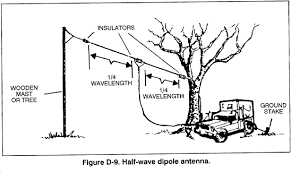
While there’s literally TONS of antenna options out there for HF, the simplest option I’ve found is the wire dipole. Remember 936? Yeah, it’s still important. Keeping it simple, a resonant dipole can be quickly constructed and erected. Each leg of the dipole is 1/4 wave long…so…
234/freq= antenna length in feet.
I use a 4:1 balun as a center to make using coax easy and keeping the impedance matched at 50 Ohms. Insulate the ends, hoist the center, and presto…you have an antenna. The antenna itself should be no more than 1/4 wavelength high. Some sources say the lower the better, some say it makes no difference. For me, in my experience, 1/4 wave works just fine. Less works fine too. Just do what you can; field expedience rules the day. What enhances the NVIS setup more than anything is the use of a counterpoise. This is simply a wire used as a reflector, just like the “legs” of our Jungle Antenna. It comes out like this:
When using resonant antennas, since they’re cut to length for a specific frequency, a tuner is not normally required. It’s a good idea to use it anyway; it protects your radio. Something important to know is that once the antenna wire is cut to length, depending on many factors it may need to be shortened more to attain a usable SWR (2:1 or less, meaning 50% of our power is being radiated). A tuner picks up the slack and keeps you from burning your radio up due to a mismatch.
So with some simple, inexpensive parts (such as this Jetstream 4:1 balun, an excellent piece of kit for $30 and some cheap speaker wire):
And an all-mode HF unit like this Yaesu 897:
An NVIS station can be put up almost anywhere, run from a couple SLA batteries also pictured connected to the 897, and sustained with a solar panel. And I can take it down and move out just as fast as I put it up.
The whole operation can be deceptively simple- while the concept is easy enough, experience is the real determiner of how effective it can be. All of this is gained by getting on the air and doing it. With the current poor solar conditions due to the approaching minimum, it takes more skill than usual to make it work- a challenge for even the most experienced among us. Getting on the air and regularly making it work it the only way to get it right.
Come train with us! The RTO course has an open spot for you, where we cover this topic and lot more. If you’d like to get more information on this or other classes, feel free to contact NC Scout at brushbeater@tutanota.com.
Share This Story, Choose Your Platform!
16 Comments
Comments are closed.


[…] A primer. […]
A good summary of NVIS, but I must quibble with this:
“…usable SWR (2:1 or less, meaning 50% of our power is being radiated)”
This is incorrect.
A 2:1 VSWR corresponds to a return loss of 9.542 dB, which is 10^(-9.542/10) x 100 = 11.1% power being reflected and lost. At 2:1 VSWR, you’re still delivering 88.9% of your transmitted power to the antenna (not all of that will be radiated; it depends on the antenna’s radiation efficiency.)
To reach the point where only 50% of your power is being delivered to the antenna — a 3 dB return loss– requires a truly terrible VSWR of ((1+10^(-3/20))/(1-10^(-3/20)) = 5.848:1.
Equations and calculator here: https://www.microwaves101.com/calculators/872-vswr-calculator
34-year ham radio operator, ARRL ARES emergency coordinator and 31-year RF engineer here. Hope this helps.
It’s a tech exam question: https://hamradioacademy.com/technician-swr-and-output-power/
The loss values are otherwise correct.
From the ARRL
https://www.arrl.org/files/file/Technology/tis/info/pdf/q1106037.pdf
Reflected power at 2:1 SWR is 11%
Ok, great. Take it up with the VEC.
2:1 actually represents twice the impedance value than what the radio recognizes, which neither of you have stated. 11% is simply what the radio absorbs, but half the power actually is traveling back and forth (eventually going somewhere), being 50% as efficient as a 1:1.
We’re being pedantic over a minor detail written three years ago about an entire other topic- which is outside the focus of the actual article. When you’re dealing with QRP antennas, they need to be <1.5:1 for any sort of efficiency as is, which was the focus of the article at the original time it was written (along with a post on working without tuners and QRP). This was reposted as a reminder primer on NVIS as requested by students from a recent class.
And that's the last word.
4.5
5
Thanks! Ordered the Jetstream balun yesterday and it shipped this morning. NVIS is high on my list of skills to have down – talking to Iceland or Estonia sounds nice but using HF within my state or the next one over seems much more important.
Here’s what I think I know so far – no ego so school me. NVIS works best at 40, 80 and 160 meters, performance dropping off as you go into 20, 17, 15, 10 and 6 being nearly useless the closer to 6 we get. Looking at the antenna math for 40 and 80, 234 / 3.9 (mid 80 band for a General holder) = 60 feet of wire for each leg and a need for 60 feet of elevation if we hold to the 1/4 wavelength rule. That’s quite a hoist and I’m not sure where I could pull it off – not to mention my coax from the balun to the tuner is only 50′ long. Problems.
Discouraged and moving to 40 meters, 234 / 7.25 (again mid band for General) = 32 1/4 feet. That’s more manageable except Amrron just announced they are ditching 40 in favor of 80 for regional nets because the skip zones are too big and much of their traffic has been passing right over nearby intended recipients.
https://amrron.com/2018/06/14/major-change-amrron-switching-to-80m-for-regional-nets/
Again problems. What to do?
Lastly for now, where does the counterpoise attach to the Jetstream balun and how long do you like to see it?
Thanks again for a great topic.
Daniel
NVIS is a type of propagation. There’s quite a bit more to it than what’s written here- as stated, it’s a primer. Typically anything above ~7.3mHz doesn’t refract in the way that’s needed for the effect. What some experience on the higher bands that provide local communication on HF is actually groundwave and not NVIS. 6m is VHF and is a whole other animal.
As we’re approaching the solar cycle a lot is changing and has changed since 2015 when I originally wrote this. 40 behaves much more like 20 used to, having long skip zones that are great for international communications but aren’t completely reliable for regional use. Then again, sometimes it is. 80 (3.5-4mHz) is quickly becoming much more reliable, especially in the afternoons to early evening.
Another issue you have is your antenna is too high- which is great for long distance contacts but bad if you want a vertical takeoff angle. Add an 80m dipole element (64ft on each leg) and you should be good to go. Counterpoises don’t attach to the feedpoint either; they’re parallel a certain distance to the antenna for a reflective property. There’s a specific formula for optimum performance, but I’ll tell you from experience laying the counterpoise on the ground (if it’s even needed, good reflective soil doesn’t necessarily need one) works just fine.
Hope this helps.
Yes, that helps. I got the antenna heights from the article above, “The antenna itself should be no more than 1/4 wavelength high. Some sources say the lower the better, some say it makes no difference. For me, in my experience, 1/4 wave works just fine.” Since I’m still very inexperienced it doesn’t take much to cross me up. Speaking of – please bear with me – are the 64′ dipole elements you mentioned in addition to the original legs or instead of them, and are you saying any counterpoise isn’t attached and are simply laid out on the ground a distance away from the array?
No problems- we’ve all been there and you’re in the right place. :)
The 64ft elements are the length needed for each 80m leg of the dipole. You can add these to the existing dipole. Look up multiband or fan dipole and you’ll see it. My own dipole has a 40m element, 60m element, and 80m element.
The counterpoise is simple; it’s just a wire laid parallel to the antenna wires. It’s not physically connected to any of the wires- it’s relationship is electromagnetic.
Ooohhhhhh….
The clouds part and I suddenly understand :)
That was a huge help and hopefully others will benefit.
Cool!
I have designed, built and have been using an all band antenna that requires no tuner. It starts with a 10m tuned dipole in the center. Then I added a section to increase the length for a tuned 15m. Then 17m on out to 75m. All sections are tuned to the lowest SWR I could get with the antenna at 20 feet. You just connect the sections to run on the band you want.
You can even remove some sections if you have limited space. You can remove the 75,60 and 40m section if you only need the 20m and higher frequency. No balun on this one. I had a spool of 14ga and some leftover 1/4in lexan from my chicken coop windows so I built another antenna to play with.
I’ve been using my icom 7300 in the field. I need a smaller battery to truly be portable.
You can see some picture of it here. https://www.qrz.com/db/KE8USA/P
Good stuff. I’ve used Anderson Power Poles as quick connects- when soldered they do pretty well. Not a permanent setup, but not bad.